
QuickBooks Clean Install Tool is another tool developed by Intuit to repair the installation of the QuickBooks application. This tool will not only help you to fix the issue that you may face while using or opening the QuickBooks application but it will also fix other component related issues in QuickBooks. Other than this, the tool is great to use and will not affect any data.
To make sure that you do not face any issues while using the tool, you have to make sure to download and install the tool properly. You need to follow a proper procedure to use the tool. Here is how you can download and install QuickBooks Clean Install Tool.
When to Use QuickBooks Clean Install Tool

You can use QuickBooks Clean Install Tool in different situations. Below we have mentioned a list of all the situations where it is appropriate to use the tool.
- You are facing an installation error despite every effort to install the application.
- In case while installing the QuickBooks application and fails to address the issue.
- In case you are trying to open more than one company file present on the network.
Keep In Mind These Things Before Using QuickBooks Clean Install Tool
Before you proceed with downloading and installing QuickBooks Clean Install Tool on the system, here is a list of certain things that you will have to keep in mind. Ensure to fulfil all the requirements mentioned so that you do not face issues.
- To start with, you will have to make sure that you have the valid license number and the product key with you. If you are using a CD to install QuickBooks, you will find the number on the packaging. Other than this, if you have downloaded or purchased the application, you will have to check for the confirmation email.
- Next, you will have to make sure to create a backup of the company file data so that you do not lose any crucial information in the process.
- Other than this, you will have to insert the flash drive into your PC to carry out the backup process. You can create a backup of the data using any of the mentioned methods.
- For this, you will have to create the backup and then start QuickBooks.
- You will then have to tap on the File tab and then choose the restore company file option.
- Now, choose if you wish to restore the backup online or use a local drive.
- Click on Next and follow all the prompts appearing on the screen to complete the backup of the file.
The Complete Process to Download, Install and Use the Tool
In case you are new to QuickBooks Clean Install Tool, you may not be aware of how you download and use it on your system. Below we have provided you with a complete tutorial to download, install and use the tool easily.
Step 1: Downloading and Installing the Tool
- To begin with, ensure that you have terminated all the background processes running on your system including QuickBooks.
- Now, you will have to visit the official Intuit website and then download the application.
- Save the downloaded file on the desktop.
- When done, you will have to look for the downloaded file with the name quickbooks_clean_install_tool.exe file and then click on it.
- The installation window will now start on your system.
- The license agreement will then open on your system. You will then have to tap on the “I accept” option.
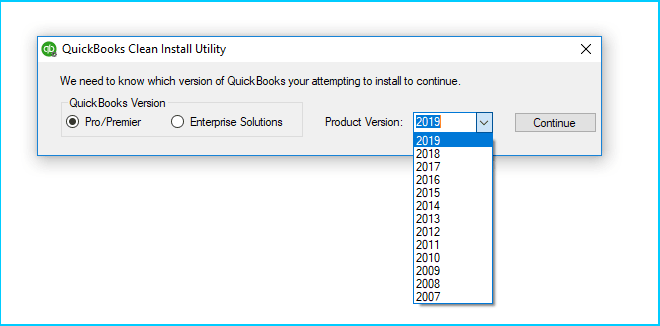
- Now, you will have to choose the version of QuickBooks. After that, click on the continue option.
- You will then see the prompt “QuickBooks is ready to try a clean installation and you’ll install this to the default directory” will appear on the screen. Tap on the OK button.
Step 2: Install QuickBooks Again
Now, if you wish to install the QuickBooks application again on the system, you will have to uninstall QuickBooks from your system. You will then have to use QuickBooks Clean Install Tool to install the tool again.
Remove QuickBooks from the System
- To begin with, open the Run window on the screen. For this, press the Windows key and R key on the keyboard together.
- In the Run window, you will have to type the control panel and then tap on the OK button.
- Now, from the programs option, you will have to look for the drop-down menu. Choose the programs and features option.
- After this, you will have to click on the QuickBooks application and then click on it to remove it from the system.
- When done, follow all the steps appearing on your screen to complete the process.
Changing the Installation Folder’s Name
Now, the next step in the process is to change the name of the downloaded file and the folder so that you can view all the hidden files. You can simply add dmg or OLD at the end of the name of the file change it. Here are the steps that you need to follow.
- First, you will have to tap on the start icon and then find the File explorer option
- In the file explorer, you will have to tap on the folder in which you have stored your company file.
- You can find the folders with the path: C:\ProgramData\Intuit\QuickBooks(year)
- When you will find the right folder, you will have to right-click on the name of the folder and then from the menu, choose rename option.
- Next, you will have to type OLD before the extension of your file. This will help you differentiate between the Old and new folders.
- Save the changes made to the name of the folder.
- In the end, you will have to proceed with installing QuickBooks on the system.
Steps to Follow if User is Unable to Rename the Folder
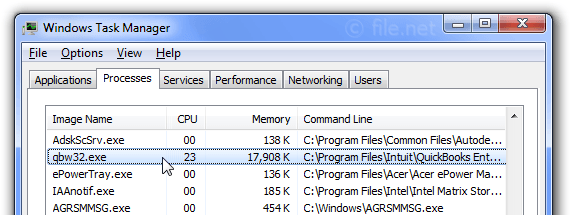
- To start with, you will have to go to the task manager on the system and then right-click on it.
- The task manager will then open on the screen. You will then have to hover to the processes tab and then you will be able to see all the processes in chronological order.
- From the list of all the processes, you will have to look for the QBDBMr.exe, QBCFMonitorService.exe, QBDBMgrn.exe processes.
- Now, you will get a prompt indicating that if you proceed with the process, you may have to face unfavourable results like loss of data, difficulties in your system. On the prompt, tap on the Yes option.
Install QuickBooks Again
- Initially, you will have to insert the QuickBooks installation CD into the system. You will then have to go through all the instructions appearing to complete the process.
- When the installation process will complete, you will have to type the correct product ID and registration number in the tool window.
- Now, follow all the instructions appearing on the screen.
- Next, you will have to tap on the Next button.
- In the next window, you will have to select the installation type according to your preference and tap in Next.
- Click on the install option. You will have to wait till the installation process is complete. On completion, you will have to start your system again.
Collecting Backup of Your Data
- First, you will have to look for the QuickBooks software installation file.
- You will then have to check for all the latest updates of the application and install the same on the system.
- Next, you will have to make sure that you have your registration number with you. You may find it on the package of the CD or in the purchase email.
- When done, you will have to type the year and you will then find the version of merchandise.
- In the end, you will have to save the backup of the QuickBooks company file on the system.
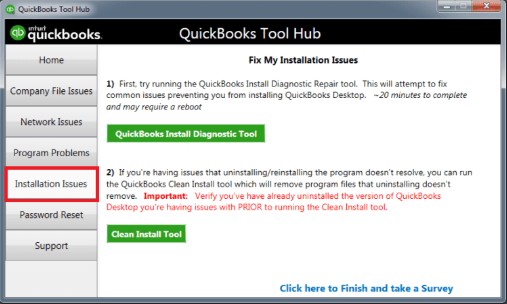
Steps to Use Clean Install Tool Using Tool Hub
Now, if you do not wish to install QuickBooks Clean Install Tool on your system individually, you can also use the QuickBooks Tool Hub. QuickBooks Tool Hub lets you use almost all the QuickBooks tools like QuickBooks Install Diagnostic Tool, QuickBooks Connection Diagnostic Tool under one software. For example, if you face company file issues, you can use QuickBooks File Doctor by clicking on the company file issues tab in the tool hub or to fix the network error, use Database server manager. You will not have to download these tools individually, they can be used using the tool hub only. Similarly, you can use QuickBooks Clean Install Tool using tool hub. Here are the steps that you need to follow.
- The very first thing that you will have to do is to get the QuickBooks tool hub from the official website.
- Now, you will have to tap on the QBToolhub.exe file and the installation file will open.
- In the installation window, you will have to tap on the Next option in the welcome window.
- You will then have to accept the license agreement.
- In the end, window, tap on the Next option and then choose the installation folder.
- When done, you will have to follow all the on-screen instructions to complete the installation.
- You will then have to close the window.
- Now, double-click on the icon of the tool.
- In the tool window, hover to the installation issues tab.
- On this, you will get the option to run QuickBooks Clean Install Tool.
- Wait for the uninstallation and installation process to complete.
So, this is it. This was the full process to download, install, and use the QuickBooks Clean Install Tool. Hopefully, this article was informative for you. To read more such articles, visit our website.
Author Profile

- Jonas Taylor is a financial expert and experienced writer with a focus on finance news, accounting software, and related topics. He has a talent for explaining complex financial concepts in an accessible way and has published high-quality content in various publications. He is dedicated to delivering valuable information to readers, staying up-to-date with financial news and trends, and sharing his expertise with others.
Latest entries
 BlogOctober 30, 2023Exposing the Money Myth: Financing Real Estate Deals
 BlogOctober 30, 2023Real Estate Success: Motivation
 BlogOctober 28, 2023The Santa Claus Rally
 BlogOctober 28, 2023Build Your Team – the Importance of Networking for Traders