

Quickbooks Bank Reconciliation is reconciling your bank account monthly. Reconciling means matching the transactions with the record you have entered in the accounting software. Quickbooks has its own module, chart of accounts, bank feed tools, and check register. Even if you have just put the transactions in the software using bank feed, forms, or some data fetching app, still, you have to reconcile the bank account in QB.
In the process, you will be reconciling your savings, checking, as well as, credit card accounts. This article will educate you on the way through which you reconcile bank statements QBO. Before that, let’s understand why Bank Reconciliation is important in QuickBooks.
Quickbooks Online Bank Reconciliation: Importance
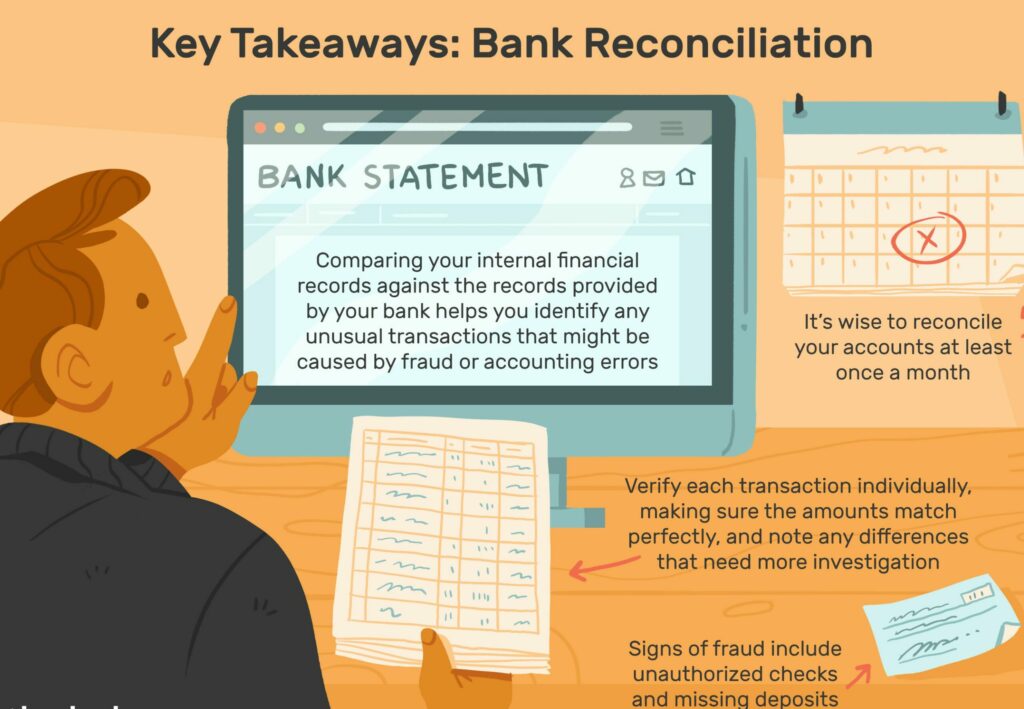
Bank reconciliations in QuickBooks are crucial as it helps users to ensure that the transaction number and amount are correct. This is because many bookkeeping errors and discrepancies take place while feeding the numbers. For example: Sometimes, users forget to put automatic withdrawals in QB.
However, banks also make mistakes occasionally. So, staying vigilant with the reconciliations is not a bad choice. Also, a bank reconciliation helps you catch any fraudulent or strange transactions in the bank account as that doesn’t get a record in the QB software.
Basically, bank reconciliation Quickbooks helps you accomplish three goals:
- Transaction amounts are appropriate: Bank reconciliation not only ensures that transactions are existing on both Quickbooks and bank statements. But it also needs the amount to be exactly the same.
- The QB transactions occurred: There are instances when a transaction in QB software can be inadvertently created. If that translation involves a bank account then a bank reconciliation will spot the fake transaction.
- Each bank transaction is properly recorded: Quickbooks bank reconciliation ensures that the bank account transitions are properly recorded in the software as well.
Check out: What is Quickbooks Install Diagnostic Tool ?
Quick Steps to Perform Quickbooks Online Bank Reconciliation: 5 Steps
Let’s learn how you can do Quickbooks online bank reconciliation in just 5 steps.
1. Open Quickbooks Online and Navigate to The Option Bank Reconciliation
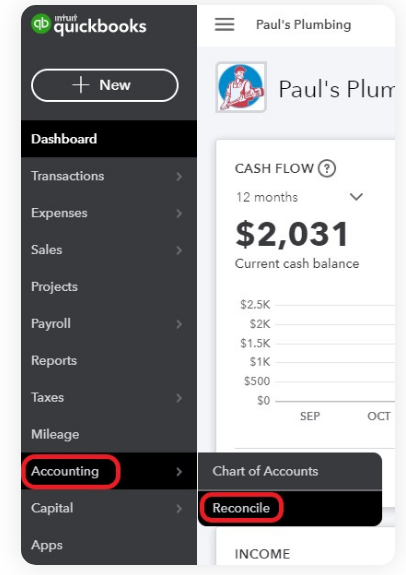
After going to the option of the bank reconciliation, tap on “Accounting”. Once done, click on “Reconcile”.
2. Choose a Bank Account You Need to Reconcile
Here comes the part where you need to pick the bank account you need to reconcile. Now provide the date and ending account balance from the bank statement. Also, you can enter interest earned on the service charges, only if these are not entered in Quickbooks already.
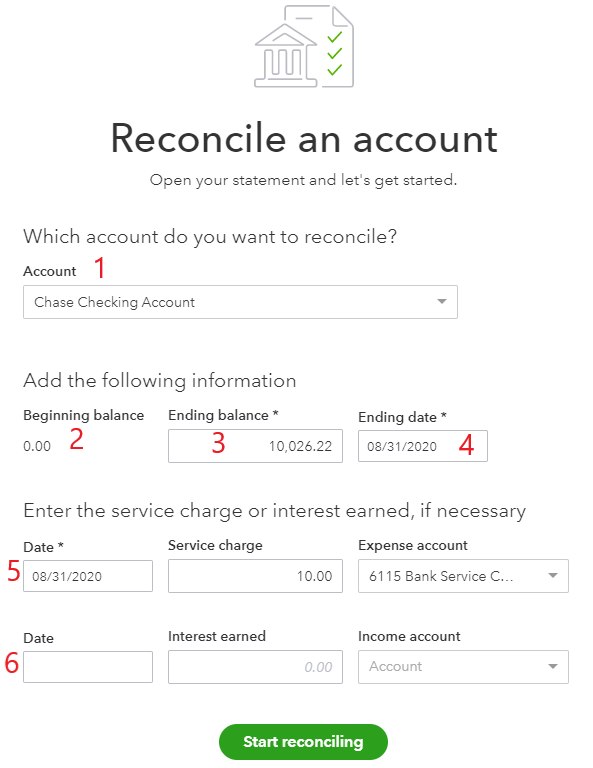
- Account: Choose your bank account for reconciliation.
- Beginning balance: It is related to your bank account. You need to agree to the statement of balance.
- The Mismatch in beginning balance: Remember that, once you reconcile a transaction, the amount has to be the same in QB also. If you change it, then the beginning balance of the screen will mismatch with the bank statements’ beginning balance.
Once this happens, QuickBooks shows a warning and gives a link to identify the last modified reconciled transactions.
- Ending balance: Here, from the bank statement, enter your ending balance.
- Ending date: Pick the ending date of statement duration.
- Service charge: Here, enter the amount, date, and expense account exactly like the statement which you have not entered into Quickbooks already.
- Interest earned: Enter, the interest you earn on the bank balance if you have not filled it in already.
After entering all the details from the bank statement, you have to hit the tab on the “Start Reconciling” tab to continue.
3. Start Matching Transactions
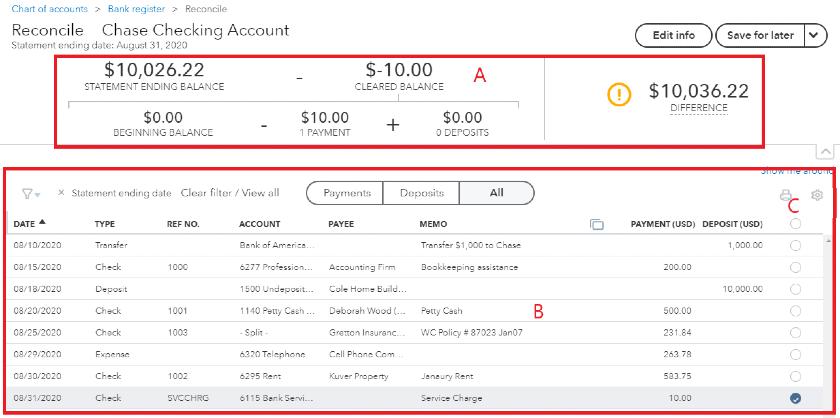
The screen of QuickBooks reconciliation shows a cleared activity summary and detailed transactions list.
Cleared transactions summary: Statement ending and beginning balance are from the earlier screen. Beginning balance – payments cleared + deposits cleared gives you the cleared balance.
Payments and deposits are the total transactions having a radial button. A summary’s right, you will find the difference between cleared balance and statement ending balance. This difference has to be zero to finish your reconciliation.
List of transactions: All QB transactions are not cleared by the bank earlier in the current statement duration. Remember that, any transactions which are not cleared this existing month will again appear the following month.
Radial buttons: Tap the button radial on the transactions’ right side.
Also, from the list on the screen, trace the transactions to the bank statement. If you see a match, tap the radial button beside the transaction on your screen. Place a tick mark against the transaction. Once you tap a radial button, your transaction will be shown in the cleared activity summary.
Problems tracing deposits: Your bank statement contains deposits that will have various checks in a single translation. If QB shows a different deposit for every customer check, the software will face difficulty to trace the deposits. So, next time, always use undeposited fund accounts to deposit customer checks.
4. Verify that Quickbooks Bank Reconciliation Has a Dissimilarity of Zero
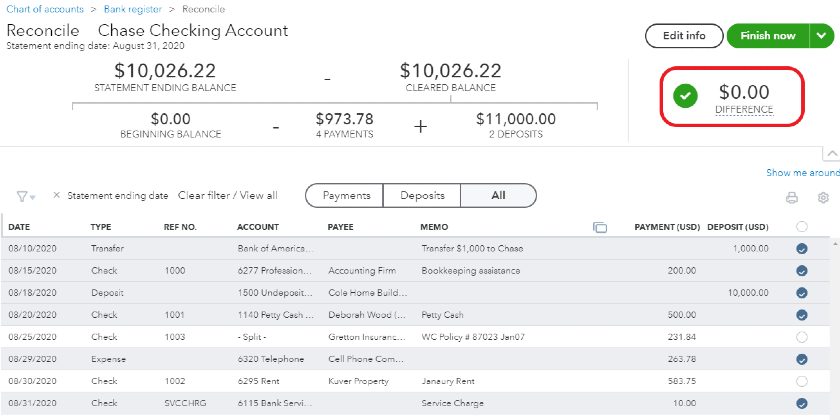
After matching the QBs and bank statement transactions, the difference should be Zero. Let’s understand with an example: Bank has not cleared checks #1003 and #1004. This is not a matter because these checks were issued at month’s end. These transactions will automatically roll over to the following month’s reconciliation. Then the bank will clear them.
Make sure not to finish the reconciliation until you see that the difference is 0. Or else, you will have to face Quickbooks bank reconciliation problems next month. It will make future reconciliation complex. After bringing the difference to Zero, tap on “Finish now” to finish the reconciliation.
5. Review and Save The Reports of QuickBooks Bank Reconciliation
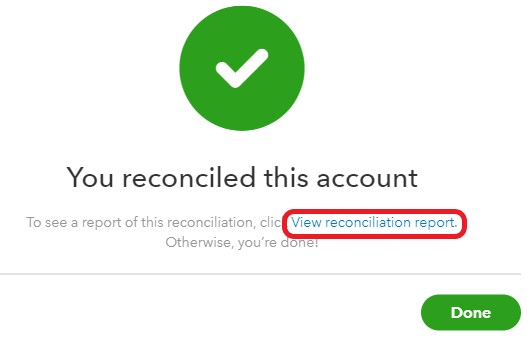
After finishing the above steps, it’s time to review and save the reports. QB will send you a confirmation with a link to check the QB reconciliation report:
Tap on “View Reconciliation Report” to check them. The report will show summary information and other details such as checks and deposits and outstanding or uncleared checks. These are under Additional Information.
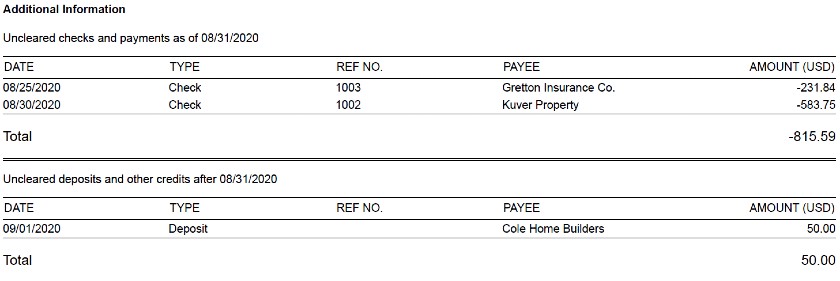
You need to review it every month to track that the transactions make sense. Pay more attention to those checks that are older than three months. You can contact vendors or employees and confirm if their checks need re-issuance. If you are satisfied and get all details about the uncleared transactions, you are done with Quickbooks bank reconciliation.
Here’s How to Undo Bank Reconciliation in Quickbooks Online
QBO reconciles each transaction separately, so you can reconcile only one at a time.
- Navigate to “Banking”.
- Select “Registers”.
- Choose the “Account” via Register Name.
- Then, tap on the transaction you want to reconcile.
- Now, then delete “R” to modify its rank so that it can be unreconciled.
- If you need to reconcile each transaction part for specific periods then you can print the reconciled transaction to smooth the process.
Based on your Interest: Quickbooks Auto Data Recovery Tool
Final Words
Quickbooks bank reconciliation basically is a digital balancing of your bank accounts. It helps you catch any fraudulent or strange transactions in the bank account as that doesn’t get recorded in the QB software.
We hope that you get all relevant information to learn all aspects of QuickBooks Reconciliation through this post. Additionally, we have also provided a way through which you can undo bank reconciliation in Quickbooks Online.
If you have any queries related to the elements mentioned in the post, do write them below.